A Blog about Greek Food and Greece

  • Pickle Recipe (toursi): How to make your own traditional pickles

    Pickle Recipe (toursi): How to make your own traditional pickles

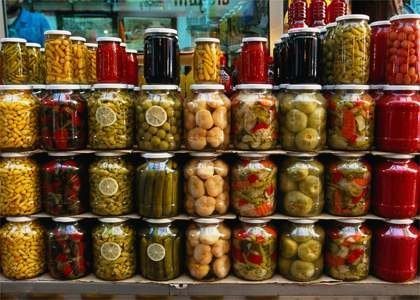
    One of the best things that you can have a side dish is pickles or  “toursi/τουρσί” as it is being called in Greek. You know about and you see them more or less every time on the super markets.

    I always used to have toursi at home because my father used to make it in a bowl by himself. Its not difficult to make and its really enjoyable and tasty.

    There are different kind of pickles depending where you are coming from, for example in USA and Canada they like to do cucumbers, while in Greece , Turkey and generally the Arabic countries I think we are more on green peppers and other vegetables.

    The process is basically really simple, you leave all the vegetables in a lot of vinegar and let it the vegetables receive it for some days.  But who am I to talk about those old and traditional recipes.

    Well, recently we got my father as a present a laptop so we can communicate a little bit more easily, and as a first job I made him write the recipe about toursi …the pickles recipe.  So here it is in his own style…the recipe for pickles as my father send it in his first email to me… 😀 (obviously translated…)

    https://www.instagram.com/p/B8XTCS3BKjH/

    How to make Pickles – Toursi

    • 600 to 700 grams of green peppers
    • Apple vinegar (portion depends on the size of your bowl)
    • Water
    • Pepper/Salt
    • Ginger

    We can replace them with other vegetable or put them all together if we have space.

    For example cauliflower, cabbage etc.

    • CAULIFLOWER. Wash and cut it and add it in the jar
    • CABBAGE. Cut the leaves Wash and cut it more or less as our palm
    • BULBS. Small onions like the ones we use for the stew, just clean them and add them inside .
    • GHERKINS. If you find small  (approximately 10cm)  add them inside. Only clean the top and the bottom place. After 5-6 days remove them and cut them in fat slices like in the salad. Add a little olive oil and eat them.

    Lets see now how can we make it.

    • Rinse all your vegetables and place all the vegetables in a bowl, add the salt and toss well. Allow to steep for 4 hours.
    • Squeeze excess liquid in batches with your hands and place in other bowl with enough vinegar to cover the half of the bowl and add water in the rest.
    • Throw in the pepper and a slice of Ginger. Close the lid and shake to make sure it goes everywhere.
    • Open up again and add a teaspoon of olive oil.
    • Close the lid and seal it for 7 days. Afterwards it should be ready to taste.

    Seal with lids and place in fridge. Keeps well for 6 weeks.

  • Tower of aubergines

    Tower of aubergines

    I’ve been feeling a little bit vegetarian lately as I said on my last post. Maybe too much of meat food of the last few days has brought me in this stage.

    Last time I went to the market I saw a man selling aubergines and I wanted to make papoutsakia again at some point. Nevertheless, I have realized in the past few months…that when you cook…you start from something…and sometimes you end up to something different…

    I always liked aubergines and loved any relevant recipes

    Not sure why, i guess it is my Asia Minor heritage or the fact that my father did a lot of work to introduce them to our weekly menu.

    Christmas is coming!

    In Greece when the summer comes, those vegetables are the ones that really shine most above all and you can find them in many different dishes. Sometimes though you do like to improvise and see how lucky can you get.

    So for this case, i decided to make a fun recipe that focuses on aubergines as a main ingredient and …really looks nice. Even if i am biassed in this occasion..

    Ingredients for Aubergine Towers

    • 2-3 Aubergines thinly sliced
    • 2 tomatos sliced
    • 1 onion
    • 200gr of Feta cheese
    • 250gr of teen can tomato juice

    How to Cook them

    Clean the aubergine slices and fry them in a pan, 2-3 minutes from each side really quick.

    When you finish, you place them in the side and get ready to make the small aubergine towers. The idea is to put one ingredient over the other creating a mixture of flavors.

    So first a slice of aubergine, onion, aubergine, tomato, aubergine and on top a teaspoon of tomato juice. Top it up with sprinkled feta cheese

    Repeat until you are done with all the ingredients.

    Wrap the pan, in a baking foil and cook it in the oven for an hour or so, removing the oven in the last 15 minutes.

    You can never go wrong, with feta, aubergines and tomatoes!

    Aubergines with feta cheese-1
  • Spinach Rice recipe…or in Greek …Spanakorizo

    Spinach Rice recipe…or in Greek …Spanakorizo

    Spanakorizo is not a dish that you hear really often about in the Greek cuisine. It is though considered one of the classic ones to have especially during the summer months. Spinach is used in couple of recipes and it is common to have pies with it in Greece.

    Other than the typical spinach pie that you can find in many places around Greece, spanakorizo is the 2nd most famous spinach related dish.

    The following Spinach rice recipe is a typical Greek recipe that my mother and most of the Greek homes I suppose are doing. It’s vegetarian and one that I started appreciating when I got older…as before the only foods that I liked were Meat related… The funny thing is that the recipe is one of the easiest ones that exist. The basic ingredients are dill, spinach and rice…

    Last time I cooked it was in a Monday after a long drinking weekend at the Broads in Norfolk UK. I always try to cook something vegetarian after long sessions of drinking in order to convince myself that I am doing a healthy life…:$

     INGREDIENTS SPINACH RICE RECIPE –SPANAKORIZO

    • 1 kilo of Spinach sliced. (washed really good)
    • 1 spoon of Olive oil
    • 1 bunch of fresh onions sliced
    • 1 small cube of Feta Cheese (if we want)
    • 1 big bunch of dill
    • 1-2 tomatoes juice
    • the juice form one big onion
    • Salt/Pepper and 1 cup of Rice

    Method

    • In pot we add olive oil and throw in the Onions and stir for 3 or 4 minutes around.
    • Next we add the Spinach and the tomato juice and continue to stir well so they dont stuck on the bottom of the pan.  Throw in the rice and add water until they are half covered.
    • Salt and Pepper and then add the sliced dill as well as the lemon juice. Taste and add more if it is needed
    • When the water is almost drained we serve it together with the trimmed feta cheese.

    Some additional things:

    Usually I like to add one vegetable cube as it adds a little bit to the flavour but it’s up to you.

    What I do like a lot is to add feta cheese.  I have cut a big piece of feta cheese in small cubes and I add it to the pot after I have removed it from the heat, stirring it so the feta cheese goes everywhere.

    According to some other recipes you can add tomato juice but I prefer to served it together with tomato and cucumber salad …and some octopus that I brought to UK from my last trip in Greece !

  • Greek Food Vs Turkish Food

    Greek Food Vs Turkish Food

    This summer I decided to do something different, it was the first time that I travelled alone in some country. Even if most of my friends do it, for me it was quite new and really enjoyable.

    I visited Turkey and managed to have a good view of their local foods. In this trip other than visiting places like Ayia Sofia, the Blue Mosque and Basilica Cistern I was really happy to see that there are no main differences between the Greek food and Turkish food. To be honest, I didn’t have to travel all the way to Istanbul to learn that, but it was nice to see it and taste it myself.

    The funny thing in those kinds of situations is that always there will be people fighting about who made it first in order to claim the originality of the recipe. For example, how to you call that kind of coffee, Greek Coffee or Turkish coffee? To be honest I don’t know…it looks exactly the same to me and they are made exactly the same way.

    Running around in Sultanhmed I managed to see a lot of restaurants that were serving exactly the same foods like my mother used to make me. So both Greeks and Turkish know what Papoutsakia is and both Greeks and Turkish knowwhat baklava and Loukoumi is. Maybe they change the name a little bit from time to time but everything else remains the same.

    If you look up a little bit the history of those two countries you will realize that they had…and still have a lot of common things. They are like two people that they love to hate each other…but they are almost similar. I think that’s why all the Turkish people were calling me “bacanak” (=brother in law)  when I was telling them that I was Greek … 😀

    On with the food…

    Greek Food Vs Turkish Food

    Well, one of the best ideas came from my father when he told me that I should go and eat fresh Fish in Galata. I managed to find the Galata Bridge and eat one huge beautiful and tasty Sea Bream, together salad and big bottle of wine. The food was excellent and the view of Bosporus magic. Nothing fancy there in terms of cooking, simple grilled sea bream with lemon and olive oil. All that you need in order to enjoy the fish…

    In Turkey also they are really well known for their kebabs.  Another good friend of mine suggested to me to eat at Tarihi Sultanahmet Koftecisi Selim. That restaurant exists since 1920 and does exclusively…(yeap you guessed it…kebabs). What really caught my eye was that there menu was really small. They have the same menu since 1920 without adding or removing anything.

    So you don’t have many choices…but those choices really worth it., It was by far one of the tastiest kebaps that I have ever eaten.

    They had big beans salad, pilaf (plain rice..more soaked) and of course grilled meat balls which you can find also in Greece with small differences in the recipe.

    One of the things that I really enjoyed in the last days of my trip was the famous “Kazan Dibi”. You can find it inTurkey and the Northern parts of Greece. Basically, it’s a really –really tasty desert that looks so easy to make it but (as my dear mom said) it’s so difficult.  The ingredients are: butter, rice flour, milk, corn starch, sugar and flavouring.

    My father, who always says the best stories, explained to me how it was created… According to the legend, the personal cook of the Sultan wanted to make a dessert for his master and had that idea. He created the cream and he was giving the burned side of the cream from the Kettle to the servants of the Sultan. However, one day the Sultan saw what his servants were eating and decided that it was much better. So Kazan Dibi was created, which means bottom of the kettle. That’s why it is served with the “burned” side up. The burnt side of the kettle is caramelized collecting the sugar and making it …heaven…

    There are so many more foods that I should have tried but simply didn’t had the time. The only general difference that I could find between Greek and Turkish cooking is that Turkish food is a little bit spicier. Despite that, my stomach never had any problem with that,

    The site is called “the greek food” but I am guessing if there is a blog similar to this in turkey…they would have more or less the same recipes J


  • Galaktoboureko recipe : the king of sweets

    Galaktoboureko recipe : the king of sweets

    One of the most difficult things in cooking is to make sweetst as you need to be precise and exact on the ingredients that you put.

    Couple of years ago I was leaving in a different house with a Greek girl in Acton Town, on west London. I was really lucky because whenever I begged my flatmate –her name was Sofia- she always made me one of her specialties, Galaktoboureko.

    Galaktoboureko is a Greek desert that is quite famous in my country. In Greece and Cyprus they used to say that you are not a worthy housewife if you dont know how to make galaktompoureko and baklava. So i guess i am now a worthy housewife… hmmmm…. (something is wrong over here…) anyway…

    My mother used to do it a lot and personally I like it a lot when it’s cold. I wanted to make it for a looong long time but never had the courage or time to even try it. Nevertheless, after a lot of waiting the time had come for one proper Galaktoboureko. I asked from Sofia this time, her recipe and… here we go

    INGREDIENTS GALAKTOBOUREKO

    • 400gr Sugar
    • 140gr semolina
    • 2 eggs
    • 1 vanillia
    • 1 packet thin phyllo dough
    • 1 litre of milk
    • 2 teaspoons of Butter

    For the syrup:

    1. 250ml water
    2. 50gr glucose
    3. 500gr sugar
    4. Peel from one lemon

    Initiate Operation Galaktompoureko

    METHOD

    Take a bowl and add the sugar, the 2 teaspoons of butter, vanilla and the semolina. At all times continue to stir continuously. When it starts to bowl remove from the heat and add the eggs while you continue to stir. You need to continue to stir until you realize that it’s boiled and it has become cream. When this happens then cover the bowl and let it cool down.

    Take a deep pan and grease it with butter everywhere. Place half of the phylo pastry sheets in the pan. Grease each one of them with butter, one by one. You need to make sure that you will cover all sides properly.

    When half of them are placed then you should pour the mixture and then turn the edges of the phyllo on the cream.

    When its done place the remaining phyllo on top covering all sides appropriately so the whole cream is covered. Make sure that grease with butter each phyllo.

    Cut the phyllo diagonally in squares with a sharp knife but only to the level of the cream. Really gently and not deep so the cream comes out…just a little bit so the heat passes inside.

    Preheat oven at 180οC and bake for about an hour until you see a golden colour on the top.

    As it is cooking you need to prepare the syrup.

    Put in a pan the sugar, water, lemon peel and the glucose and let it boil. Again, continue to stir. Let it boil for 5-10 minutes and the remove it from the heat.

    When the Galaktoboureko is ready you need to pour the syrup all over it and let it cool down before serving.

    Some prefer to eat it hot, personally I prefer to put it in the fridge after its cooled down and leave it there for 1 hour. Up to you..

    galaktoboureko
    Delicious Galaktoboureko.